
讀者:楊于葳
本文為《快速精通 iOS 16 程式設計:從零開始活用 Swift 與 SwiftUI 開發技巧》這本書的閱讀筆記與實作記錄,目的是記錄自己的學過程,以及幫助想利用 Swift 從頭建立一個自己心目中的 App 的人。以下是「CHAPTER 03 使用Swift與SwiftUI建立你的第一個App」的筆記內容。
開始這一章節之前,Xcode 應該要安裝好,並且有打開使用過了。
3.1 SwiftUI介紹
書籍裡提到的 WWDC 指的是全球開發者大會( Worldwide Developers Conference),是蘋果公司每年定期於美國加州舉辦的資訊科技活動,該活動通常在加州聖荷西會議中心舉行。 2023年的 WWDC 將於美國時間 6/5 - 6/9 線上舉行(有人數限制,需事先申請)。
2019年的 WWDC 中,Apple 宣布了一個新的框架「SwiftUI」,是 Swift 問世以來 Apple 開發者生態系統最大個轉變,與 UIKit 相比,開發者可以用宣告式(Declarative)的語法,以及用更少的程式碼建立相同的 UI。
3.2 宣告式程式設計 vs 指令式程式設計
Swift 和 Java、C++、PHP、C#一樣,是一個指令式程式語言(Imperative Programming),指令式 UI 程式設計需要開發者編寫詳細的指令,以佈局 UI 以及控制它的狀態。宣告式 UI 程式設計,可以讓開發者描述 UI 的外觀,以及狀態改變時想要做什麼回應。
3.3 使用SwiftUI建立你的第一個App
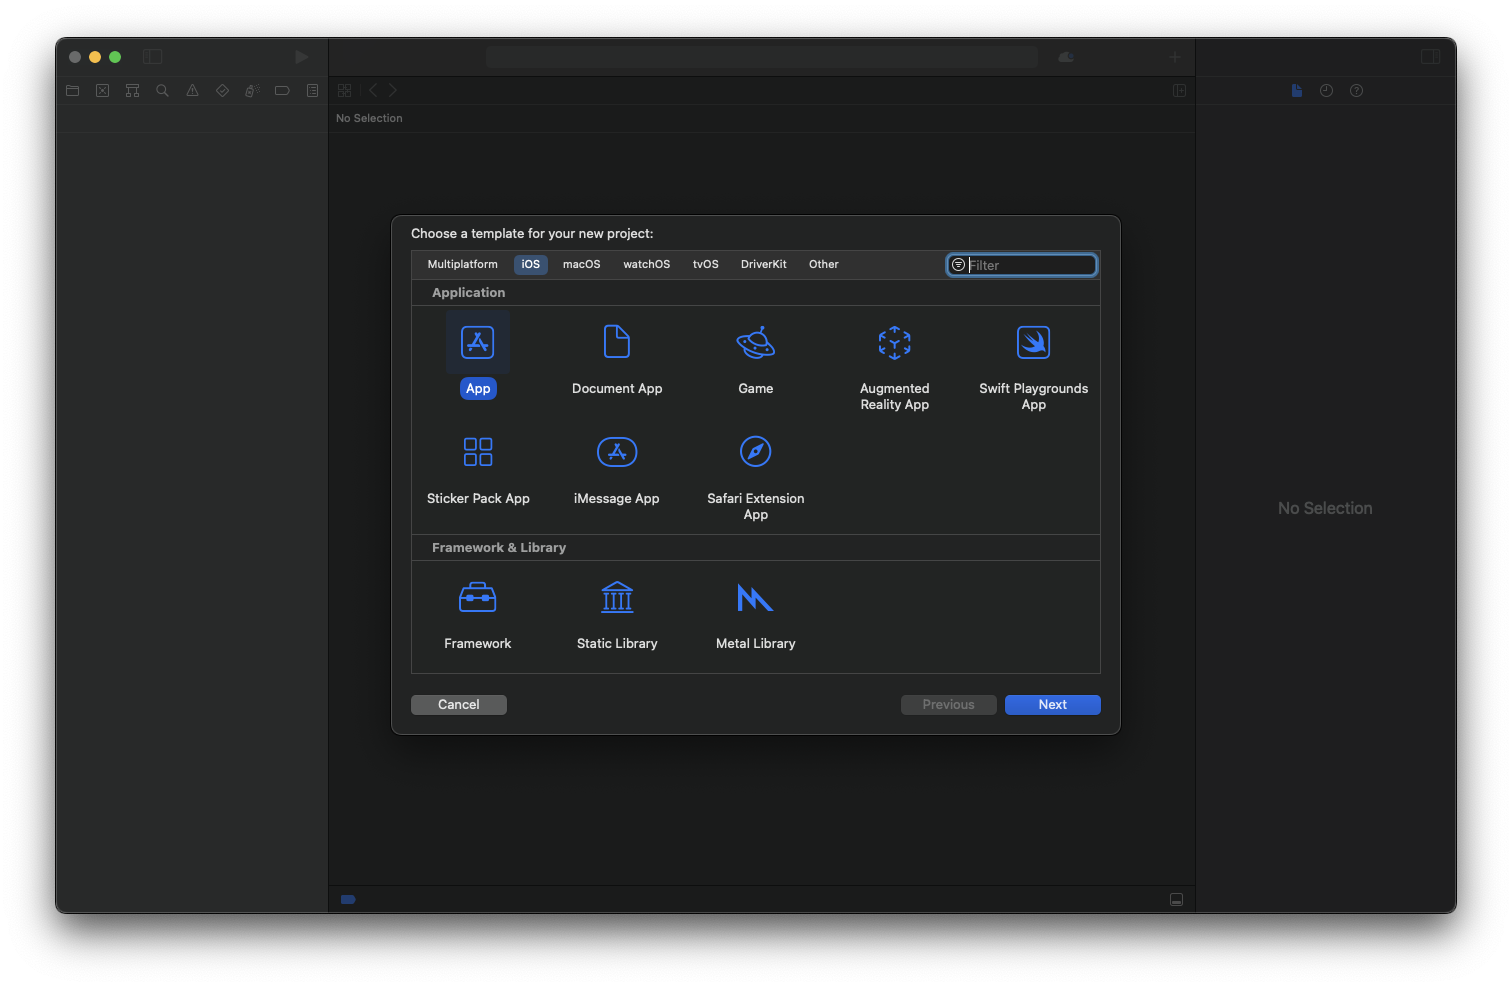
選擇 App 模板
將專案名稱設定為「Hello World」。
組織識別碼(Organization Identifier)是這個 App 的唯一識別碼,如果有自己的網站,可以將這裡設定成反向域名(❓❓❓)。或者只用「com.」後面接自己的名字。
「Interface」設定為「SwiftUI」,程式語言設定為「Swift」。「Use Core Data」和「Include Tests」這兩個選項不用勾選。
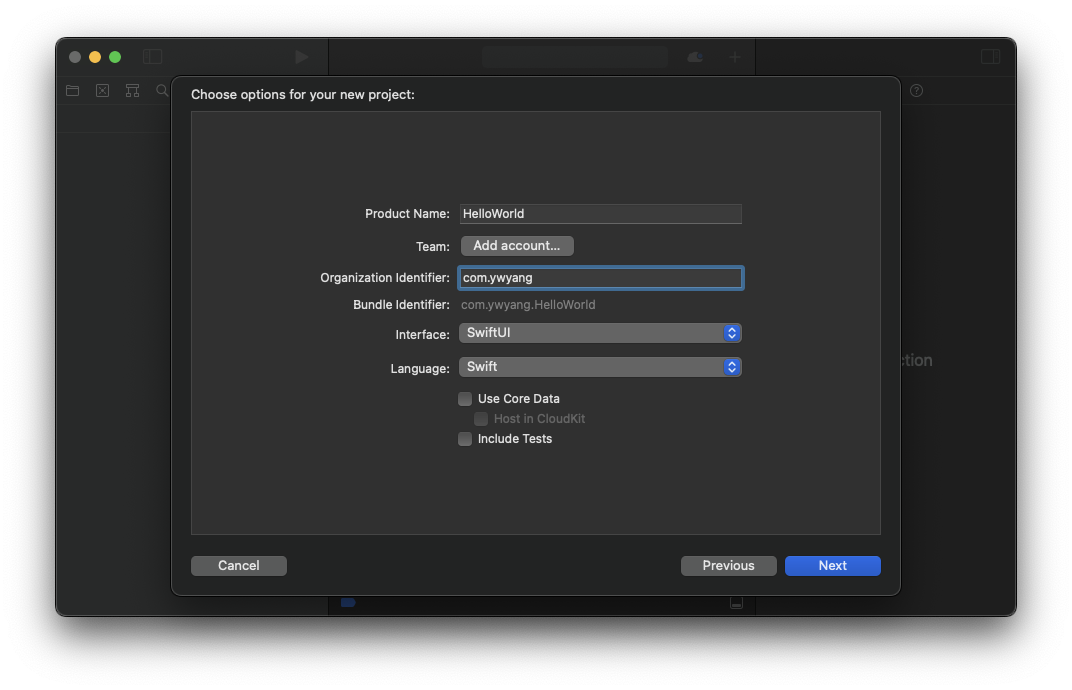
資料輸入好的畫面
按下 next 之後,會跳出一個書裡沒有提到的「Git Repository Creation Failed」視窗,只要點選 Fix,輸入作者的名字和 email 信箱,就可以了解決這個問題了。
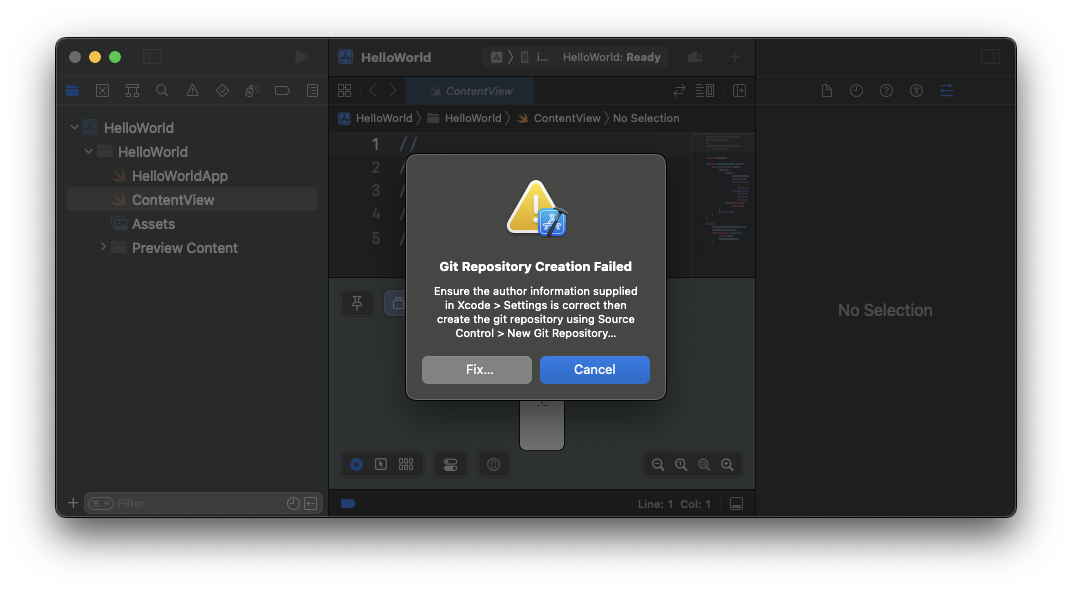
Git Repository Creation Failed 視窗
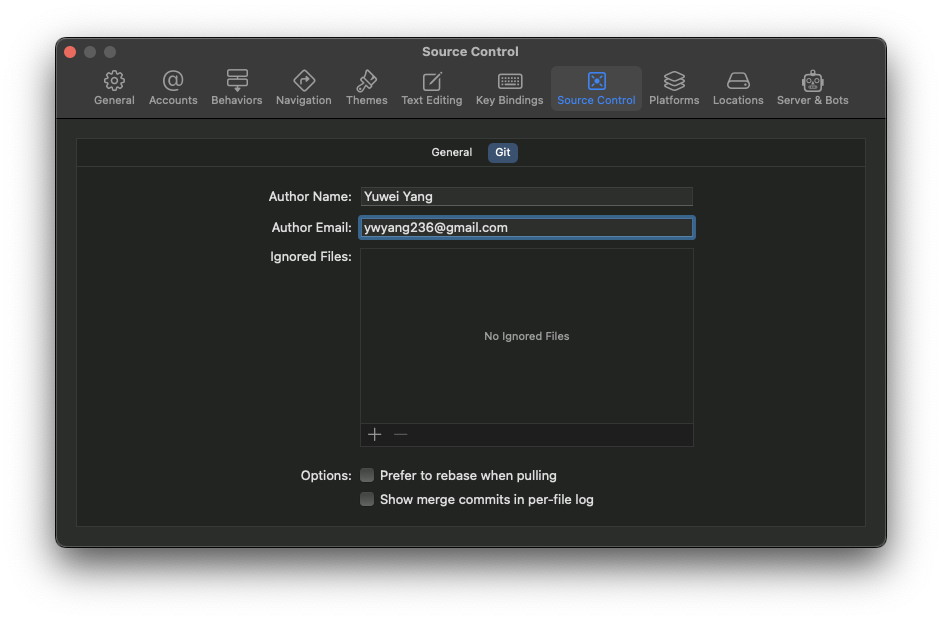
輸入作者的名字和 email 信箱
解決完「Git Repository Creation Failed」視窗問題後,就會看到一個新的專案頁面了。
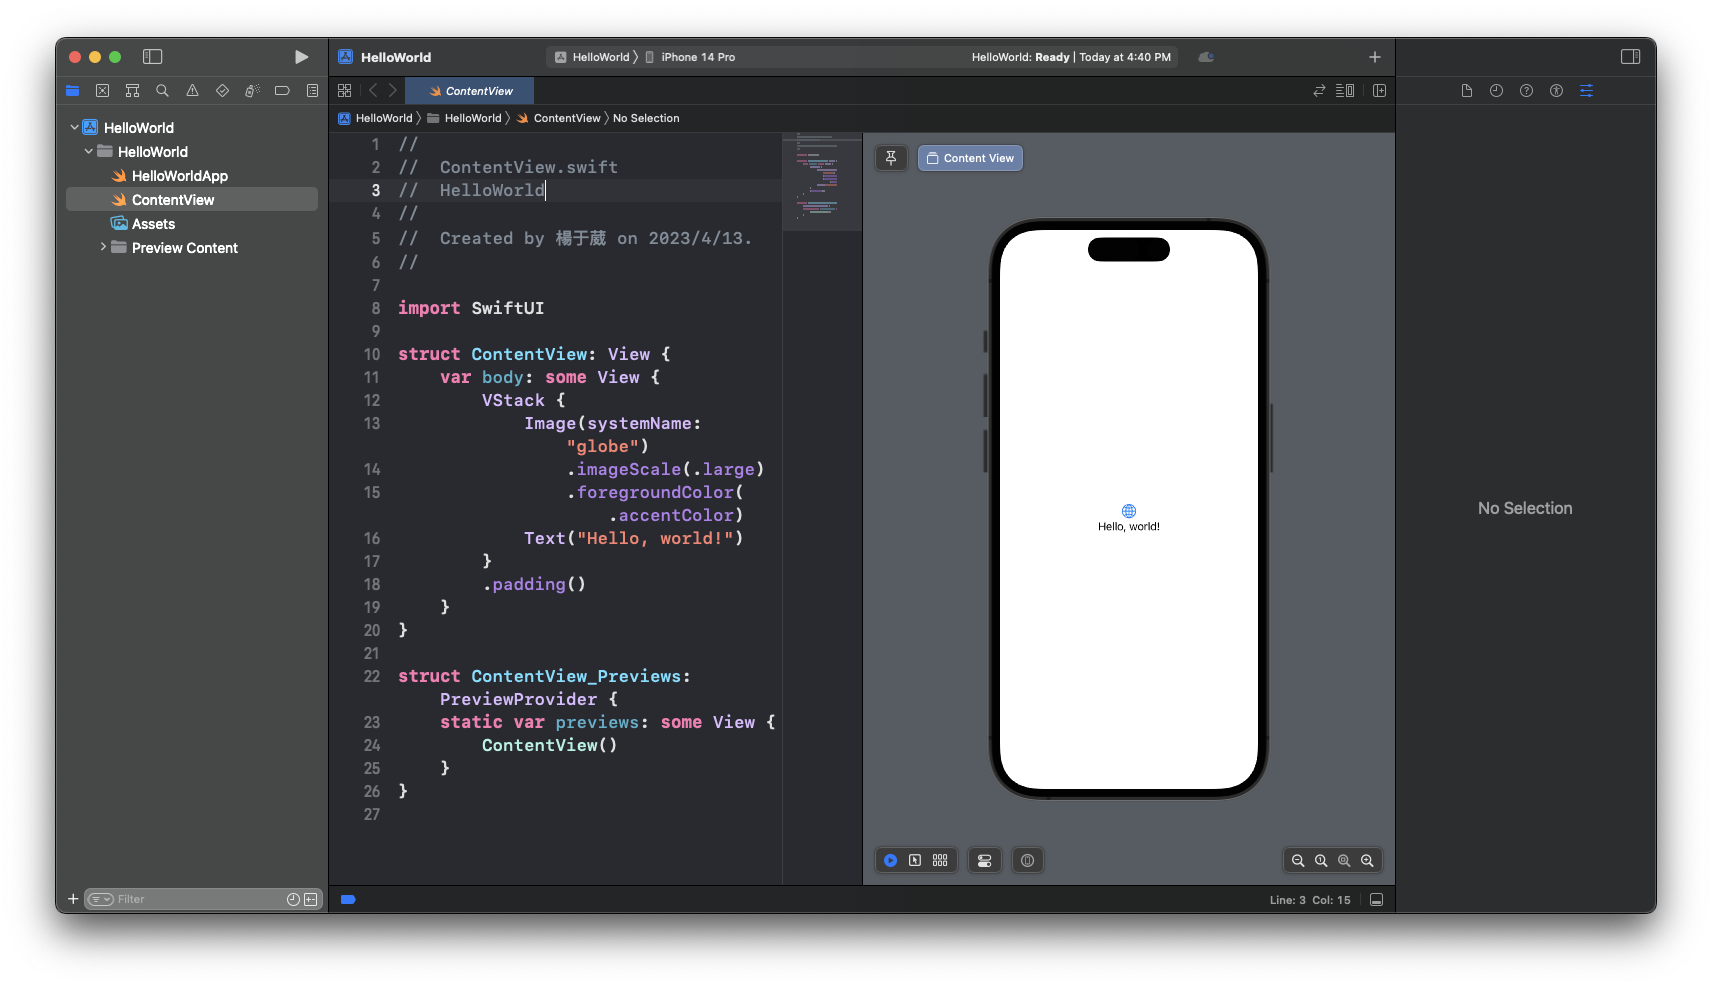
新的專案頁面
3.4 熟悉Xcode工作區
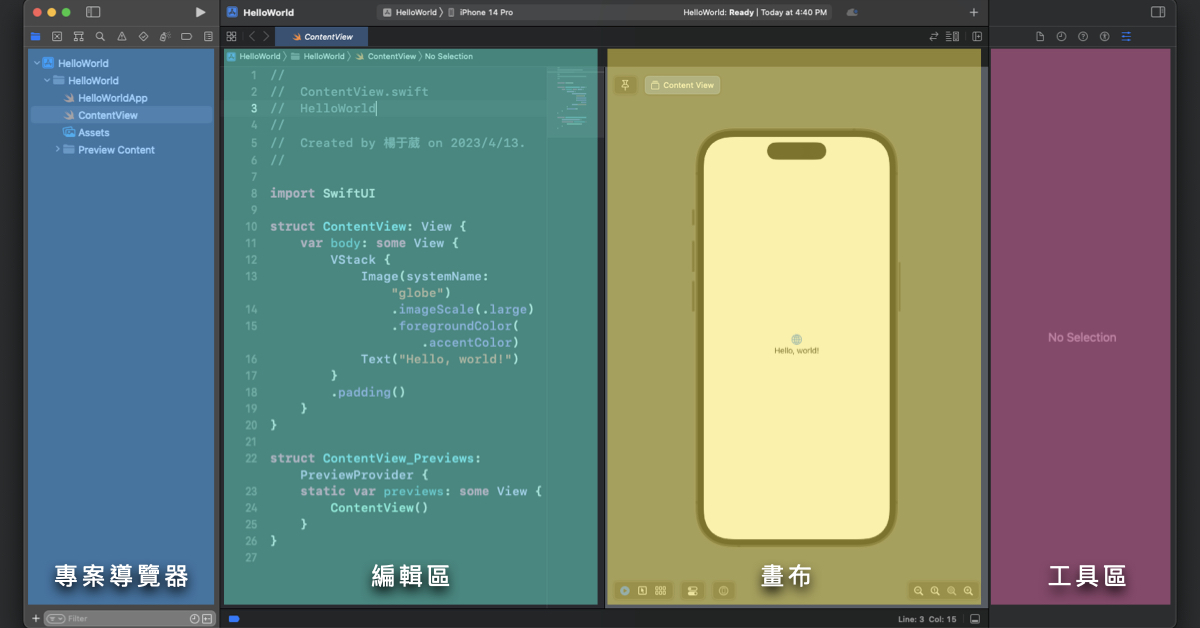
熟悉Xcode工作區
3.5 第一次執行你的App

使用模擬器執行 App
3.6 處理文字
在 ContentView 中產生的範例程式碼向我們展示如何顯示單行文字。
Text("Hello, world!")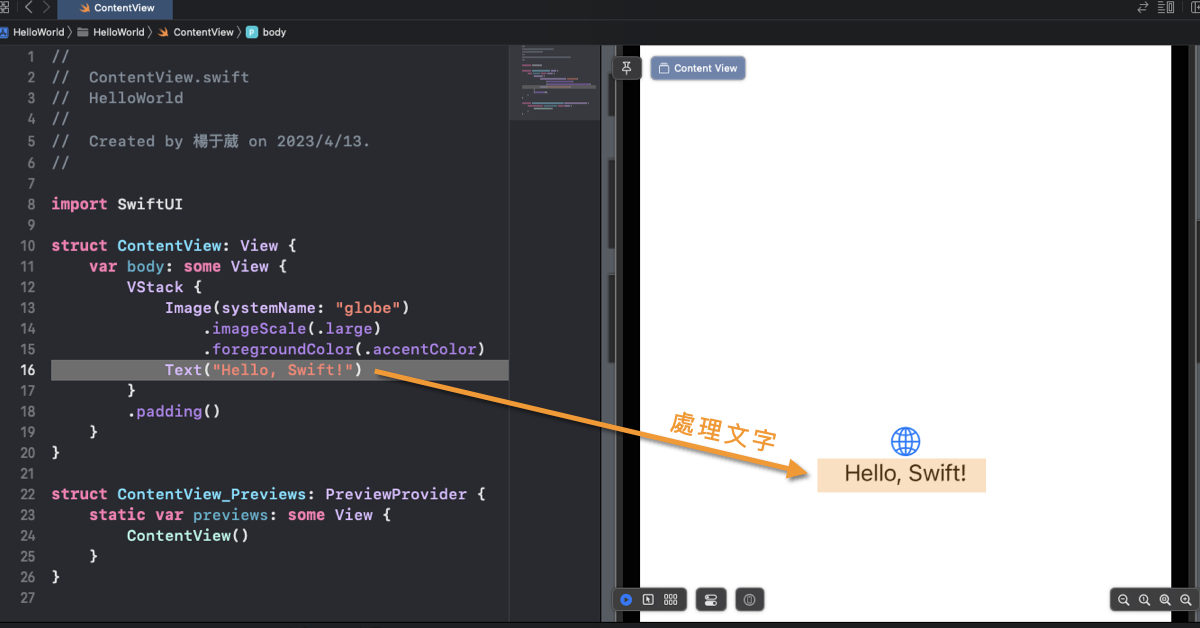
處理文字
3.7 變更字型與顏色
在 SwiftUI 裡面,可以用點語法(dot syntax)存取「修飾器」(Modifier)的方法變更控制元件的屬性,像是顏色、字型、粗細。
Text("Stay Hungry, Stay Foolish.").fontWeight(.bold)同一行程式碼中,可以串接多個修飾器,但是會變得難以閱讀,所以我們通常會將程式碼拆成多行,變成以下的格式:
Text("Stay Hungry, Stay Foolish.")
    .fontWeight(.bold)
    .font(.title)
只要修改文字樣式,以及字型,預覽畫布會立即對變更,做出相對的回應給我們看。
3.8 運用按鈕
建立按鈕的時候,需要提供兩個程式碼區塊
(1)要執行的動作: 使用者點擊或選取按鈕後所執行的程式碼。
(2)按鈕外觀描述: 描述按鈕外觀的程式嗎。
Button{
    //要執行的動作
} label: {
    //按鈕外觀描述
}
如果我們只是想要將 Hello World 標籤變成一個按鈕,可以把程式碼更新成下面這個樣子:
        Button{
            //要執行的動作
        } label: {
            //按鈕外觀描述
            Text("Hello, Swift!")
                .fontWeight(.bold)
                .font(.system(.title,design: .rounded))
        }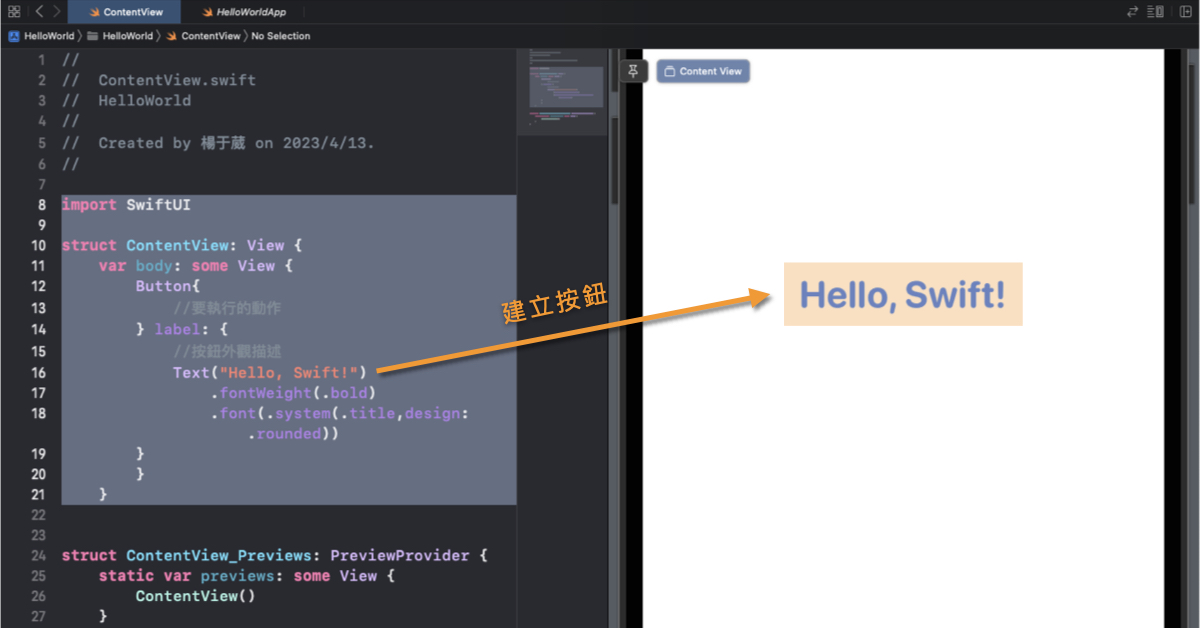
建立按鈕
3.9 自訂按鈕樣式
和 Text 的使用方法類似,我們也可以增加一些修飾器,來自訂按鈕的外觀。
.padding()
.foregroundColor(.white)
.background(Color.orange)
.cornerRadius(5)
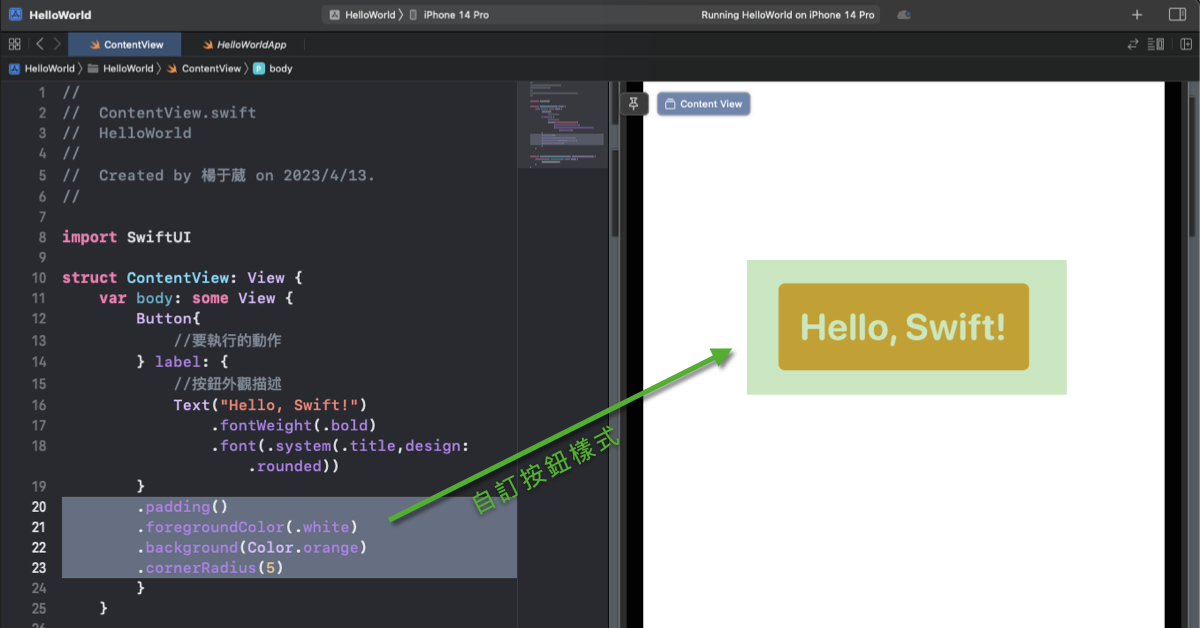
自訂按鈕樣式
首先要匯入 AVFoundation 框架,方法是在程式碼的開頭,插入敘述:
import AVFoundation
接著,在 ContentView 裡面,宣告一個變數,用來建立與存放語音合成器:
let synthesizer = AVSpeechSynthesizer()
最後,更新 Botton 的程式碼:
let utterance = AVSpeechUtterance(string:"Hello, Swift!")
utterance.voice = AVSpeechSynthesisVoice(language: "en-GB")
synthesizer.speak(utterance)
如果已經將 macOS 升級到13.0 ,就可以按下「按鈕」立即測試文字轉語音的功能,否則 App 就無法正常的運作, Xcode 會在主控台區顯示錯誤訊息,因為低版本的iOS 16模擬器預設不富有所需的音訊檔。
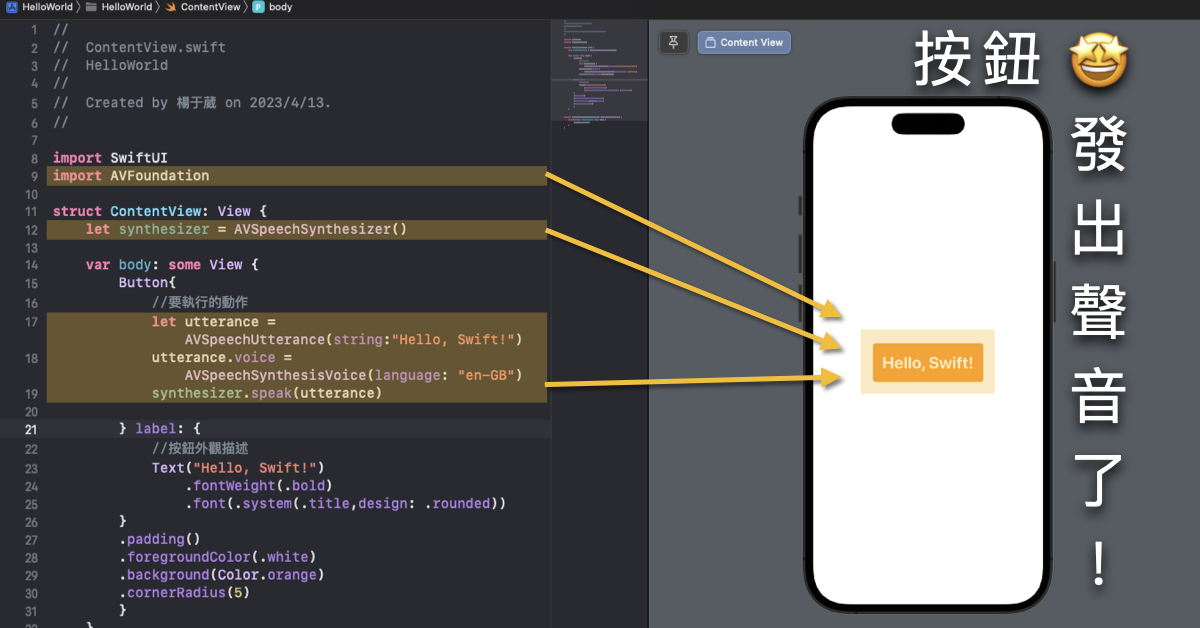
按下按鈕後,播放出一個低沈的男聲說出「Hello, Swift!」。原以為只是和 iOS 12 的教學一樣彈跳出一個視窗而已,沒想到是聲音回饋,播出聲音的那一刻,真的很驚喜!
3.11 了解堆疊視圖
SwiftUI 提供了一種名為「堆疊視圖」(Stack View)的特殊類型視圖,可以讓我們在垂直或水平方向,排列多個視圖或 UI 元件。
VStack 是一個可以垂直堆疊視圖的容器。如果我們想在「Hello, Swift!」按鈕上方,加入一個新按鈕,可以將這兩個按鈕,嵌入 VStack 這個容器裡面。
按住 command 鍵,點選「Button」,會出現選單,點選「Embed in VStack」,就可以把「Hello, Swift!」包覆在 VStack 裡面。

嵌入 VStack
接著複製一組「Hello, Swift!」按鈕的程式碼,貼在下方,建立另一個按鈕「Happy Programming」。按鈕的文字內容,和發音的文字內容,兩個地方都要記得修改。
完整的程式碼如下:
//
//  ContentView.swift
//  HelloWorld
//
//  Created by 楊于葳 on 2023/4/13.
//
import SwiftUI
import AVFoundation
struct ContentView: View {
    let synthesizer = AVSpeechSynthesizer()
    var body: some View {
        VStack {
            Button{
                //要執行的動作
                let utterance = AVSpeechUtterance(string:"Hello, Swift!")
                utterance.voice = AVSpeechSynthesisVoice(language: "en-GB")
                synthesizer.speak(utterance)
            } label: {
                //按鈕外觀描述
                Text("Hello, Swift!")
                    .fontWeight(.bold)
                    .font(.system(.title,design: .rounded))
            }
            .padding()
            .foregroundColor(.white)
            .background(Color.orange)
            .cornerRadius(5)
            Button{
                //要執行的動作
                let utterance = AVSpeechUtterance(string:"Happy Programming!")
                utterance.voice = AVSpeechSynthesisVoice(language: "en-GB")
                synthesizer.speak(utterance)
            } label: {
                //按鈕外觀描述
                Text("Happy Programming!")
                    .fontWeight(.bold)
                    .font(.system(.title,design: .rounded))
            }
            .padding()
            .foregroundColor(.white)
            .background(Color.yellow)
            .cornerRadius(5)
        }
        }
    }
struct ContentView_Previews: PreviewProvider {
    static var previews: some View {
        ContentView()
    }
}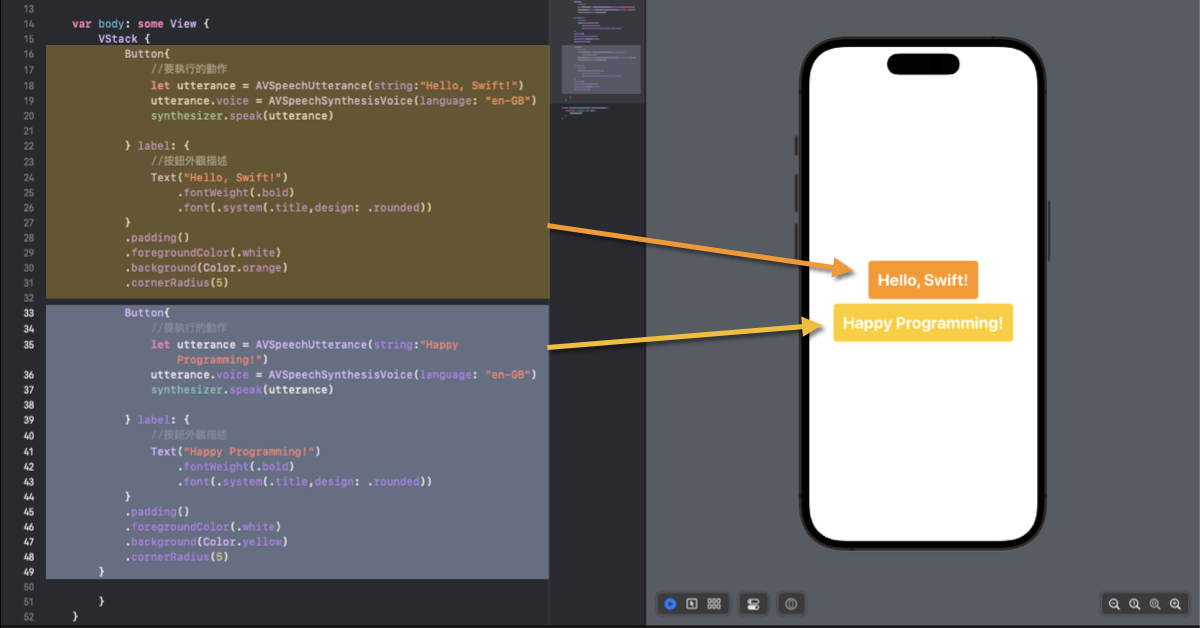
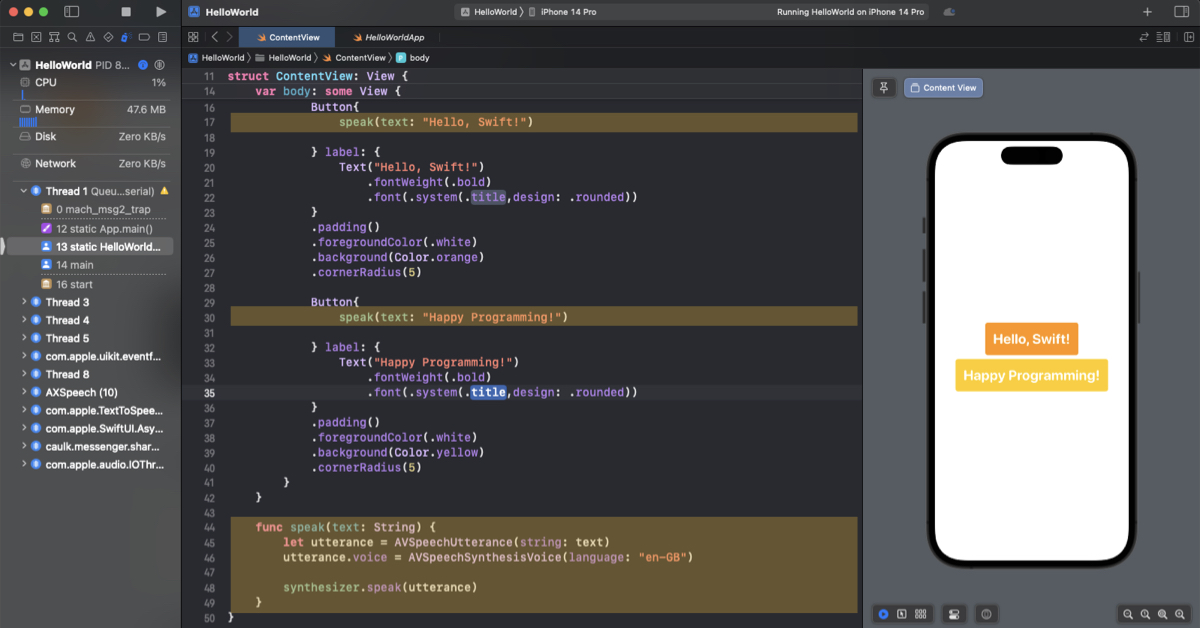
利用 VStack 呈現堆疊視圖
完成後按下兩個按鈕,都可以各別跑出正確的聲音。
3.12 了解方法
這兩個按鈕的程式碼,有很相似之處以及完全重複的程式碼,我們可以為這種重複性的任務,建立一個名為「speak」的方法,讓程式碼看起來更簡潔。
透過程式碼,讓元件賦予特定功能或執行特定的任務,就叫做「方法」。一個方法不一定要帶入參數,如果不放參數,只要寫一對空括號就可以了。而 func 就是用來宣告一個方法的關鍵字,在 func 後面是方法的名稱。
在類別裡的方法,我們用名稱來識別,如果有需要的話,方法可以帶入參數(parameter),參數定義在括號內,每一個參數都有它的名稱和型態,以冒號(:)來分開。
以下這一段程式碼,是要建立在 ContentView 裡面(當初因為少看到這一行字出現錯誤訊息,畫布也突然消失,解決方式是按下 option + command + enter ,就可以把「畫布」叫出來了。)
    func speak(text: String) {
        let utterance = AVSpeechUtterance(string: text)
        utterance.voice = AVSpeechSynthesisVoice(language: "en-GB")
        synthesizer.speak(utterance)
    }
建立方法 speak 刪除重複的程式碼
這部分的完整程式碼如下:
//
//  ContentView.swift
//  HelloWorld
//
//  Created by 楊于葳 on 2023/4/13.
//
import SwiftUI
import AVFoundation
struct ContentView: View {
    let synthesizer = AVSpeechSynthesizer()
    var body: some View {
        VStack {
            Button{
                speak(text: "Hello, Swift!")
            } label: {
                Text("Hello, Swift!")
                    .fontWeight(.bold)
                    .font(.system(.title,design: .rounded))
            }
            .padding()
            .foregroundColor(.white)
            .background(Color.orange)
            .cornerRadius(5)
            Button{
                speak(text: "Happy Programming!")
            } label: {
                Text("Happy Programming!")
                    .fontWeight(.bold)
                    .font(.system(.title,design: .rounded))
            }
            .padding()
            .foregroundColor(.white)
            .background(Color.yellow)
            .cornerRadius(5)
        }
    }
    func speak(text: String) {
        let utterance = AVSpeechUtterance(string: text)
        utterance.voice = AVSpeechSynthesisVoice(language: "en-GB")
        synthesizer.speak(utterance)
    }
}
struct ContentView_Previews: PreviewProvider {
    static var previews: some View {
        ContentView()
    }
}
除了遇到畫布突然消失之外,這部分的練習途中,可能還有不小心按到什麼特殊個功能,導致最後面的 ContentView_Previews: 變成 Previews_ContentView_Previews: ,而且還多一行 Text("Hello, World!") ,到現在還是不知道中間出了什麼事,不過最後還是有順利完成。
3.13 你的作業:按鈕與方法的應用
修改目前的程式碼,製作一個「猜猜這些電影」App。出了兩題,第一題的題目是「🪂👉☁️🌪️👉🏠🔹🌳」,第二題的題目是「🧍♀️♨️🐭🪰😶🐲」,答案是「天空之城」(Castle in the Sky)和「神隱少女」(Spirited Away)。
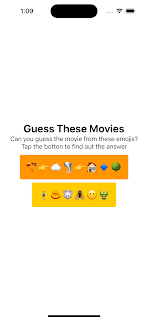
猜猜這些電影
這部分的完整程式碼如下:
//
// ContentView.swift
// HelloWorld
//
// Created by 楊于葳 on 2023/4/13.
//
import SwiftUI
import AVFoundation
struct ContentView: View {
let synthesizer = AVSpeechSynthesizer()
var body: some View {
VStack {
Text("Guess These Movies")
.fontWeight(.bold)
.font(.system(.title,design: .rounded))
Text("Can you guess the movie from these emojis?")
Text("Tap the botton to find out the answer")
Button{
speak(text: "Castle in the Sky")
} label: {
//按鈕外觀描述
Text("🪂👉☁️🌪️👉🏠🔹🌳")
.fontWeight(.bold)
.font(.system(.title,design: .rounded))
}
.padding()
.foregroundColor(.white)
.background(Color.orange)
.cornerRadius(5)
Button{
//要執行的動作
speak(text: "Spirited Away")
} label: {
//按鈕外觀描述
Text("🧍♀️♨️🐭🪰😶🐲")
.fontWeight(.bold)
.font(.system(.title,design: .rounded))
}
.padding()
.foregroundColor(.white)
.background(Color.yellow)
.cornerRadius(5)
}
}
func speak(text: String){
let utterance = AVSpeechUtterance(string: text)
utterance.voice = AVSpeechSynthesisVoice(language: "en-GB")
synthesizer.speak(utterance)
}
}
struct ContentView_Previews: PreviewProvider {
static var previews: some View {
ContentView()
}
}3.14 本章小結
這雖然是一個簡單的 App,但目前已經對 Xcode、SwiftUI、iOS SDK 內建框架有了一定的了解。

注意:只有此網誌的成員可以留言。